

Like A Giant Chocolate Brownie Baked Inside A Pie!
If you’re looking for an easy, crowd-pleasing dessert, it doesn’t get better than this Chocolate Chess Pie recipe.
Classic pie crust is made from scratch, stuffed with a decadent chocolate filling, and topped with homemade whipped cream. The evaporated milk gives this pie a velvety smooth texture and a rich, creamy taste. The pie is baked long and slow on the lowest rack of the oven for a texture that is custard like without being dry. It’s almost like a brownie pie!
If you’ve never had chocolate chess pie, this classic southern recipe is perfect to try! Great for feeding a crowd, it’s easy to make and tastes as if it came from your favorite local bakery.
For more rich, chocolate dessert recipes, try this chocolate torte with almond flour, my fudgy flourless chocolate cake, or these irresistible homemade chocolate truffles—they require just 4 ingredients!

Ingredient Notes
First, grab a pie dough. You can use store-bought, but it’s really easy to make a flaky pie crust at home. Plus, they freeze beautifully! We usually keep one on hand in the freezer at all times!
For the chocolate chess pie filling:
- Unsalted butter: Melted and combined with the chocolate.
- Semi-sweet chocolate: Make sure it is finely chopped.
- Granulated sugar: Used to sweeten the filling.
- Large eggs: Provide structure, stability, and texture.
- Evaporated milk: For a creamy taste.
- White vinegar: Helps create a thick, custard-like texture with just a bit of tang to balance out the sweet flavors.
- Pure vanilla extract: Used to bring out the chocolate flavor.
- Instant espresso powder: Helps enhance the chocolate. (We love DeLallo’s espresso powder!)
- Kosher salt: Just a pinch enhances the rest of the ingredients.
For the homemade whipped cream, you’ll need heavy cream, confectioner’s sugar (aka powdered sugar), and pure vanilla extract.
Equipment: Rolling pin, 9-inch pie dish, medium-sized microwave-safe bowl, whisk, wire rack


What Is Chocolate Chess Pie?
Chocolate chess pie is a variation of classic southern chess pie. It’s got a custard filling made from a combination of evaporated milk, sugar, eggs, and butter. And while it has a similar rich flavor and thick consistency to traditional chess pie, there’s one key difference — chocolate!
Unlike a classic chess pie, chocolate chess pie is made by melting semi-sweet chocolate and butter and adding the mixture to the custard-like filling. The dessert takes on a rich, fudgy quality similar to brownies and is guaranteed to satisfy even the strongest of sweet tooths!


Step-by-Step Instructions
You made my flaky pie crust recipe, right? Ok, good! After it’s chilled in a fridge for 30 minutes, roll out the dough on a floured surface, creating a circle that is about 12” round. Transfer to a pie dish, then tuck the excess dough underneath the edges. Flute the edges with two fingertips, or crimp them with the tines of a fork. Refrigerate the crust until it is ready to fill.
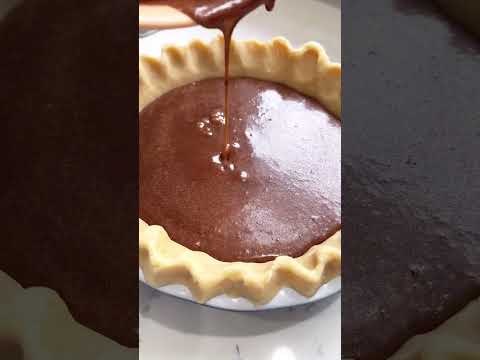
Prepare the filling. Place the butter and chocolate in a microwave-safe bowl. Heat them in a microwave in 30-second intervals, stirring in between. Set aside to cool. In a second bowl, combine the rest of the filling ingredients, then whisk until smooth. Slowly add the chocolate mixture, whisking until the ingredients are fully combined.
Pour the filling into the prepared crust, then place the chess pie on the lowest rack of the oven. Bake for 15 minutes. Then, keep the oven closed, reduce the heat, and continue to bake until the filling has completely set. Transfer the pie to a wire rack, and let it cool for 2 hours.
You’ll love chocolate chess pie with homemade whipped cream!

Expert Tips
- Don’t over mix the ingredients! The texture of this pie is kind of a mix between a brownie pie and a chocolate custard-filled. Over mixing the ingredients will affect the texture.
- Pay attention to the cook time! This chocolate chess pie recipe requires a change in oven temperature while cooking. Set a timer so you don’t forget to reduce the oven temp!
- Don’t skip the 2 hour chill time! This is crucial to allow the center to set. If you slice into your chess pie too early, it will still be gooey. Let the pie cool for at least 2 hours before slicing.

Make Ahead, Leftovers, and Storage
- Make ahead: The pie crust can be made up to 3 days in advance. Keep in a fridge until needed (or freeze for up to 6 months!). The filling can be prepared up to 1 day in advance. Store in an airtight container, then let it come to room temperature before filling the crust and baking.
- Leftovers and storage: Allow the chess pie to cool completely. Cover completely, then store at room temperature for 1-2 days or in the refrigerator for up to 5 days.
- Reheating: If you prefer to enjoy the pie warm, reheat thawed leftovers in an oven between 275-300°F for about 20 minutes or until heated through.
- Freezing: Baked and cooled chocolate chess pie can be covered and frozen for up to 3 months.


Serving Suggestions
With whipped cream, of course! This is perhaps the easiest way to enhance any pie recipe — plus, it’s quick! Add heavy cream to the bowl of a stand mixer. With the mixer running at medium speed, slowly add in the confectioner’s sugar and vanilla extract. Continue to whisk until soft peaks form. Once smooth and fluffy, dollop the whipped cream on top of the chocolate chess pie. This would also be incredible topped with our Coffee Whipped Cream!
This chocolate chess pie recipe can be served cold, room temperature, or warm. If you don’t want to make whipped cream, try serving it with one of the following:
- Vanilla ice cream
- Powdered sugar
- Chocolate shavings
- Fresh berries

Quick Tip About When It’s Finished
You’ll know the pie is done baking when the crust is golden brown and the center of the filling no longer jiggles.

This is seriously one of my favorite chocolate desserts of all time. It’s creamy, rich, and loved by pretty much everyone.
If you make this Chocolate Chess Pie recipe, please let us know by leaving a review and rating below!
And make sure to sign up for our newsletter and follow along on Instagram, TikTok, YouTube, Pinterest, and Facebook for more Well Seasoned recipes! Don’t forget to tag us on social channels when you make a recipe at #wellseasonedstudio and upload your photos below! We love seeing what you’re up to in the kitchen!
Other Recipes You Might Like:
Milk Bar Pie (Formerly Crack Pie) with Oatmeal Crust Light As Air, No-Bake Chocolate Mousse Pie Ari’s Foolproof Chocolate Bourbon Pecan Pie Easy, Fudgy Chocolate Cherry Dump Cake Ari’s Wild Maine Blueberry Pie with Frozen Berries
Tell Us What You Think!
If you make this recipe, don’t forget to leave a review and rating—we value your feedback and it helps us keep creating (and sharing!) free recipes. Your support means the world!
Rate this Recipe
Rich, Fudgy Chocolate Chess Pie (Brownie Pie)
Video
Equipment
Ingredients
For the pie
- 1 Homemade Pie Crust for this recipe you'll only need 1 pie crust, though the recipe makes 2
- ½ cup (8 Tbsp; 120g) unsalted butter
- 3 oz (85g) semi-sweet chocolate, finely chopped
- 1½ cups (300g) granulated sugar
- 4 large eggs
- ½ cup evaporated milk
- 2 tsp white vinegar
- 1¼ tsp pure vanilla extract
- 1 tsp instant espresso powder
- ½ tsp Kosher salt
For homemade whipped cream
- 1 cup heavy cream
- 2 Tbsp confectioner's sugar
- 1 tsp pure vanilla extract
Instructions
- Roll out the pie dough. Roll the dough out on a lightly floured surface to create a circle that is about 12” round. Carefully transfer to a 9-inch pie plate, then tuck the excess dough underneath the edges of pie dough. Flute the edges with two fingers or crimp with the tines of a fork. Refrigerate until ready to fill.
- Melt the chocolate and butter. Preheat an oven to 350°F / 175°C. Place 120g unsalted butter and 85g chopped chocolate in a microwave safe bowl. Melt in 30 second increments in a microwave, stirring between intervals, until completely smooth. Set aside to cool slightly.
- Whisk remaining ingredients. In a separate bowl, whisk together 300g sugar, 4 eggs, ½ cup evaporated milk, 2 tsp white vinegar, 1¼ tsp vanilla extract, 1 tsp espresso powder, and ½ tsp Kosher salt.
- Stir in the melted chocolate. Add the melted chocolate and butter mixture, then stir until fully incorporated.
- Bake the pie. Pour the filling into the prepared pie crust, then bake on the lowest rack in your oven for 15 minutes. Reduce the temperature to 325°F / 163°C without opening the oven, then continue baking for an additional 50-55 minutes, or until the filling has completely set.
- Cool, then serve. Transfer to a wire rack, then allow to cool for 2 hours before slicing. Top with homemade whipped cream (instructions below). Can be enjoyed cold, room temperature, or warm, but unless you want a soft filling, don’t skip the 2 hour wait time.
- To make whipped cream: Place 1 cup heavy cream in the bowl of a stand mixer fitted with whisk attachment. With the mixer running on medium speed, add 2 Tbsp confectioner’s sugar and 1 tsp vanilla extract. Continue whisking until soft peaks form. Whipped cream should be used immediately or transferred to a storage container, sealed tightly, and refrigerated for up to 24 hours.
Notes
- Make ahead: Pie crust can be made up to 3 days ahead and refrigerated (or frozen up to 6 months). Filling can be made 1 day ahead; bring to room temp before baking.
- Storage: Store cooled pie at room temp for 1–2 days or refrigerate up to 5 days.
- Reheating: Reheat thawed slices at 275–300°F / 135–150°C for about 20 minutes.
- Freezing: Freeze baked, cooled pie up to 3 months.
Nutrition
Photography by: Cambrea of Cambrea Bakes


The texture!! Divine!
It really is perfect! Like eating a brownie inside a pie! xo, Ari
Is it okay to substitute the semi-sweet chocolate with a darker chocolate, such as 60-62% cacao?
Hi Julie! Yes, absolutely–that will make the flavor even richer. And there’s enough sugar already in there that you shouldn’t need to add anything additional. Enjoy, snap a pic of the finished result, and please report back! xo, Ari